Print finishes study task 13
Main purpose of this task is to influence and educate myself on production methods & print finishes for the development and completion of the augmented print brief.
For each print finish I will discuss the production methods, digital/commercial preparation, costs, potential uses in my project, limitations & advantages of there use's and visual examples. If possible include my own.
Spot UV
The overall purpose of this is to create a gloss finish on a section or a "spot" of design to make it contrast between the paper stock used and the application of the spot UV. Its often used to make things stand out a little more and add a little depth and hopefully the end user will engage with the product more due to it standing out.
The varnish is applied to the area and cured and dried using UV light, it can be applied to most materials, more common on paper stocks though, glass, plastic and wood are sometimes used though.
To prepare for UV coating not much is needed, just specify the area to the service provider through naming the colour used through the colour palette preparation as "varnish" the specific area you want varnishing will then be carried out by a special machine.

Flocking/Felting
Flocking gives a nice texture and added tactile feel to a design, it could be used for products promoting or supporting fashion or textile products or services. There are two possible methods, a more hand crafted process could involve cutting out the shapes of felt (either by hand or using a die cutter) and applying them with a special adhesive.
Or electrostatic flock applicators charge the fibres of the "flock" and are attracted to a special adhesive using this electrostatic process. I imagine this to be fairly expensive though, and a hand crafted method would be more conceptually relevant to fashion services that offer a high quality feel as hand made products are often perceived as high quality as opposed to mass produced products.

Spot Varnish
Spot varnish is similar to UV as they are both a kind of "Varnish", UV is the thickest available though giving a more raised feel off the paper and has more gloss too it.
The spot Varnish is a process using clear ink that can be applied in different thickness's, spot varnish is uses like spot UV but is also used as a method of preventing ink rubbing off and keeping paper or card from tearing. Its also a lot more expensive process.


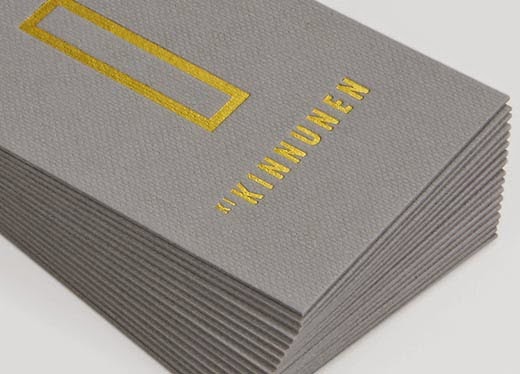
Foil blocking
Deriving from ancient egyptian process's its been adapted into modern day print using a letter press technique along with heat, pressure & time in conjunction with the foiling material. These materials can be used in there various versions to achieve metallic, gloss, matte, clear reflective, pearl, marble, wood grain, pastel, full colour and holographic effects.
It can be used to create a raised effect (Foil emboss) like seen bellow.


"Production for Graphic Designers 5th edition Alan Pipes" is a method of foil blocking that uses gloss black and white full colour foiling to create a glossy contrast of colour on the matte red cover.

But can also give a de-boss impression. Often used on logos and type on business stationery, greeting cards, wedding stationary. It gives of quite as high end feel when used in the correct context.
Embossing/Debossing & Letterpress
Debossing and embossing are two techniques that can create an impressed imd or type into paper leather or vinyl. Embossing is done by the image or type been pressed into the material so that the intended visible element appears raised, Debossing is obviously the opposite of this with the visual area appearing to be be embedded or pushed in.
The process is completed by using the intended logo, image or typography as an artwork to create a template which is then used to cut a metal die and counter die. These fires are made from brass, copper, or magnesium. Brass is the strongest material and can withstand the most use.
The material is then placed between the metal die and counter die and is then pressed together with heat, this heat helps maintain smoothness on the embossed area. There are other methods of embossing, colour embossing allows the addition of coloured ink. Blind embossing is the process without ink.
The deboss process is the same as embossing mostly, but the debossing process raises the material around the the die impression as apposed to raising the design area within the material itself.


The process uses letterpress techniques.
Lamination
This is the process of applying an ultra thin plastic coating/film. There are gloss, silk and matte finish's. A lamination will cover the whole side of a product or both sides if required, so a downfall here is you can't be selective to give these effects to certain areas of the design.
The pro's of lamination is that it can enhance the strength and appearance of paper or boards, its low cost as its cheaper than UV and Varnishing. It eliminates cracking of ink on creases and folds.
Theres no set up requirements just specify the side of the design that needs laminating.

High gloss laminate give a nice sharpness and contrast of colour and detail in images.

Matte laminate adds a high end and luxurious elegant finish to the surface.

Die-cut
Die cutting is a process that allows intricate shapes to be cut out very accurately, much like laser cut without the risk of burn on paper based and wooden products. To set up for die cut the artwork needs to be set up in illustrator using a 0.5 or 1pt line and set that line up with a Pantone/Color swatch named "Die Cut" set this colour to a spot colour.
Pricing all depends on the complexity of the shapes that require cutting as each specified shape through the spot colour shapes in the EPS file you provide will be made into a "die", a metal punch that is used to cut out the sections of the design.


Laser cut
I recently had a laser cut workshop and see lots of potential uses for it. I was initially worried about preparing files for laser cutting but the software I would be using would be in college, simply create a vector file which then exports into the software for operating the machine. These lines in adobe illustrator should be converted to paths/outlines.
You then select each outline/path on the software to chose what the machine does with that line, the settings are:
Cut Through
Engraving
Kiss Cut (a lighter engrave)
Raster

Laser cut works amazing with acrylic, the fumes that it gives off can be risky for asthmatics so limited cut times will keep things safe here.
I recently had a laser cut workshop and see lots of potential uses for it. I was initially worried about preparing files for laser cutting but the software I would be using would be in college, simply create a vector file which then exports into the software for operating the machine. These lines in adobe illustrator should be converted to paths/outlines.
You then select each outline/path on the software to chose what the machine does with that line, the settings are:
Cut Through
Engraving
Kiss Cut (a lighter engrave)
Raster
Laser cut works amazing with acrylic, the fumes that it gives off can be risky for asthmatics so limited cut times will keep things safe here.

For external use I imagine specifying each "path" with a colour code outlining what kind of laser cut needs to be used.
Perforating
Perforation is a good way to include augmentation in a subtle way, although not completely interactive it does involve hands on aspects with the end user, maybe to tear off a section of a design for there use.
Perforation is a good way to include augmentation in a subtle way, although not completely interactive it does involve hands on aspects with the end user, maybe to tear off a section of a design for there use.

Or like hungry sandwich club's robot they made, to give playful opportunities for the end user. Doing this with car parts and creating a car maybe quite nice. It would also emulate the construction and engineering process of Japanese engineering, it could influence an idea that would support and introduce the end user to the "build a drift/Time attack car" page on the website. Maybe give the user opportunity to create there own car?


The process involved punching holes in a design/product using die cut techniques, laser cutting techniques, punching techniques or pins and needles. The process allows disassembly of a product, often used for tearing off sections of a product.
Binding
This is a print finish that I need to look into a lot, as Im making a photo book to contain some more of my high quality photographs to give the viewer a hands on and tactile feel for the images, it will also serve as a vehicle to inform them that the website contains further images.
I need to keep the binding technique linked and influenced with the concept of the site. Japanese engineering & mechanics been one main focus. Traditional Japanese Craft been the other.
There are a lot of binding techniques out there, a sketchbook I had last year had a nice brief summary of the most popular techniques in the back of it.


.jpg)
.jpg)
The main purpose of a bind is to hold pages or leaves together, an ergonomic consideration is obviously for it to be hard wearing. The pages shouldn't be falling out after a few uses. These examples bellow explore more experimental binds unlike your common staple bind or perfect bound.
This is a print finish that I need to look into a lot, as Im making a photo book to contain some more of my high quality photographs to give the viewer a hands on and tactile feel for the images, it will also serve as a vehicle to inform them that the website contains further images.
I need to keep the binding technique linked and influenced with the concept of the site. Japanese engineering & mechanics been one main focus. Traditional Japanese Craft been the other.
There are a lot of binding techniques out there, a sketchbook I had last year had a nice brief summary of the most popular techniques in the back of it.
The main purpose of a bind is to hold pages or leaves together, an ergonomic consideration is obviously for it to be hard wearing. The pages shouldn't be falling out after a few uses. These examples bellow explore more experimental binds unlike your common staple bind or perfect bound.


I especially like these two, a Japanese bound and a book bound by screws could influence my bind keeping relevance with Japanese engineering and mechanics and traditional Japanese craft.


Assembly & Folding
Again like the binding I need to pay particular attention to the folding and assembly of the product to keep things relevant to Japanese engineering and traditional Japanese crafts. Externall printing/service wise theres no real requirements here, folding and binding machines tend to follow simple movements, if you want something more complex like bellow its probably likely you will have to hand fold and construct them.
CNC machines and such engineering machines offer more complex construction methods but to mass produce using these methods would work out very expensive.
The bellow examples show an excellent level of craft and consideration to construction methods to enhance the final product or in this case been the main focus of the product as the physical designs on these are very minimal and simplistic.
As my website is very minimal, clean and simple in quite a structured layout maybe a consideration on how everything is assembled and placed together would strengthen and work alongside the website with obvious influence coming in from Japanese engineering again and traditional Japanese craft. Concentrating on this rather than complex and un-necessary visual design elements (colour, type, image, layout etc)
Carry this minimal and structured layout seen in the website through into the physical products and concentrate on construction methods, use of materials, construction methods and print process's relevant to the end user and the concept of a strong image focus and influence from Japanese engineering, Motorsport and traditional Japanese craft.


Consider use of materials and how to assemble products, nuts and bolts would be a good binding method relevant to engineering.
Die-stamping
Coming from the 16th century like most current finishes that add a touch of elegance to design Die stamping is no different.
A 3 dimensional and tactile feel can be brought to the work and is a process that uses copper plate dies again like embossing and debossing. Effects can then be applied using hot foil stamping techniques.


Hot-foil stamping
This is a process that is used to apply metallic foil available in previous mentioned styles used in foil blocking, and as mentioned is used in the Die stamping process to create 3D effects.
Foil stamping machines use heat and pressure to apply the foils to the desired area of the design.
This is a process that is used to apply metallic foil available in previous mentioned styles used in foil blocking, and as mentioned is used in the Die stamping process to create 3D effects.
Foil stamping machines use heat and pressure to apply the foils to the desired area of the design.


Glow in the dark (physical augmentation)
Depending on the application glow in the dark inks can be incorporated in the initial print or used as an additional finishing point to a print.
In this case I will discuss how a digital printed piece like the below posters can have an additional finish applied to give it glow in the dark interactions, in this case it suited perfectly to the use in nightclubs and as promotional material for a music festival.

Glow in the dark inks can be mixed in with the screen printing medium and applied onto the poster after the digital printing process.

What Im taking from this
Although a lot of these print finish's look aesthetically pleasing, its important to consider the appropriateness of there use in relevance with the concept and the message been delivered. I want to influence the crafting process of my physical products around traditional Japanese crafts along side elements of Japanese engineering.
Laser cutting would be a good method to emulate certain attention to detail and accuracy often seen in Japanese engineering.
Binding methods could obviously include a Japanese bind for the photo book I intend to make, also binding with bolts or screws would be cool to emulate that mechanical/engineering feel.
Interaction can be achieved by physical augmentation relevant to Japanese engineering giving the end user the opportunity to make and construct something themselves.
Paying close attention to accurate folding and complex assembly techniques will also link nicely with the engineering process's Japanese automotive's go through.
Although not an actual "finish" digital prints can be "finished" with more analogue and traditional finishes like screen printing.
Lamination can increase durability and also contrast to give sharpness to imagery which could benefit aesthetics for the high quality images and increase the durability of the photo book there contained in.
Japanese woodblock is a traditional craft that could be used as a finishing point to the digitally printed photographs for the photo book maybe.
No comments:
Post a Comment